1. Preparing Game Installation
Thanks to the method that is used within this Modlist, there’s not much you need to do to prepare your game other than having a clean game installation.
The way this Modlist manages direct root game files and mod files is by implementing a plugin for Mod Organizer called Root Builder, which directly injects any files that are meant to be inside of the Root folder such as xNVSE. Further instructions can be found down below.
NOTE TO RUSSIAN/PCR Users
The list currently does not support users outside of the U.S. region, I.E Russian/PCR and the install will not be able to finish if you have a Russian/PCR version of the game.
NOTE TO NON-ENGLISH SPEAKERS
If you have your game set to any other language that is not English, Wabbajack will not be able to install the list.
Simply go to your Steam library, right-click Fallout: New Vegas and click properties. Locate the Language option in the General tab and set it to English.
After the Wabbajack installation has finished, you can set the game language back to your preferred default language.
Cleaning Game Files
- Begin by (re)installing Fallout: New Vegas, with all of the DLC.
- After that, locate your MyGames Fallout: New Vegas folder and delete all of the provided INIs inside of there.
- You can ignore this if you have other Modlists and instead make the INIs profile-specific
- Launch the game via the Steam launcher to generate new INI files.
Concerns for Default Game Files
As many of you may be aware, many Wabbajack Modlists utilize a feature called Stock Game that prevents Modlists from overwriting the main directory of your game installation so you can simultaneously install multiple Modlists at once. This Modlist does not do that, instead it uses a plugin called Root Builder.
What Root Builder is, is it’s a plugin that allows root directed files, such as xNVSE, to be directly or virtually implemented into the game folder without actually having to install it directly.
The benefits of this are as follows:
- Seamlessly integrate root files, such as xNVSE, directly into the game directory
- Installation of root mods like any other normal mod installation through Mod Organizer
- Simple enabling/disabling of root mods for further compatibility amongst other Modlists
Patching Game Executables
Before beginning any sort of modding, patching your games executables to 4GB is necessary, that way the game can run properly with certain mods.
To begin:
- Download and extract 4GB Patcher from Nexus anywhere on your computer.
- Drag and drop the executable in the extracted contents to your games folder.
- In your games folder, right-click the FNVpatch.exe and Run as administrator
Installing NVHR
New Vegas Heap Replacer is a quintessential mod for accomplishing a properly modded Fallout: New Vegas experience.
Manually installing NVHR is no longer necessary, as it is automatically installed with the modlist!
2. Modlist Installation
Download and install the Modlist via the Nexus Mods main file or through the Wabbajack UI.
It is recommended to use a folder structure similar to this:
Wabbajack (Install the Wabbajack program here)
┗ Wabbajack.exe
Modlists (Make This)
┗ Wasteland Prospects (Make This and Specify the Modlist Installation Here)
  ┗ (Wabbajack Files Will Download Here)
Note that the installation of the Wabbajack Modlist REQUIRES to be installed on the same drive as your Fallout: New Vegas installation, otherwise things will fail.
It is also highly recommended to ensure that your Fallout: New Vegas installation is outside of any Windows Protected folders, I.E. Program Files (x86) and Program Files. Ideally, just simply install your games outside of your Windows installation drive.
Optionally, once you’ve got the Modlist installed, you can add a shortcut to the executable file inside of the Mod Organizer installation to directly launch the Modlist every time.
Generating Fallout INIs
Sometimes, the INIs shipped with the modlist can cause issues such as crashing or unoptimized performance specific to your system. To address this, just simply regenerate the INI files.
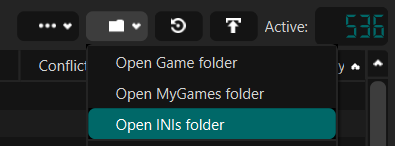
Do this by clicking the Folder icon at the top, select Open INIs Folder and delete the Fallout.ini and FalloutPrefs.ini.
After you’ve deleted the INIs provide in the profiles folder, in the executable dropdown in MO2, select the Fallout Launcher option and then run it once. You don’t need to launch the game, just run the launcher and it will prompt you with two pop-ups, click OK on both.
Other Installation Notes
Updating The Modlist
If and when an update is released for the Modlist, you can simply overwrite the same directory to where you first installed the Modlist. Simply download the latest version, install through Wabbajack and set the installation location to the current directory for the Modlist.
Note that doing this will overwrite any changes you have made to mods, any additional mods you’ve added, and any files generally made by you. If you would like to save these files, simply create a folder elsewhere and save all of the mods, configs, and files you wish to keep in that folder and re-add them every time.
If you wish to prevent this, simply add [NoDelete] to the beginning of any mod you personally installed into Mod Organizer and Wabbajack will know to avoid removing this. Courtesy of Screaming Lake for this
Capping Your FPS
Within the modlist, and New Vegas itself, there can be a variety of issues if you play with an uncapped FPS, i.e. havok items freaking out, facial expressions messing up, lockpicking menu or other menus acting super fast, etc.. This step is required, which if you don’t do and post a report about any issues related to uncapped FPS, will be ignored.
This can easily be addressed by capping your games framerate using any of the hundreds of methods out there on the Internet. One of the simpler and easier ways of doing it is by using a program called RTSS, or RivaTuner Statistics Server. You can download this here, then run it and add the FalloutNV.exe to the list and specify a cap limit of 60 frames, or your monitors refresh rate. It’s recommended to cap to 60 FPS as the game engine starts to not handle havok physics so well above it.
A Small Note
You may have noticed that after you have installed the modlist and opened up Mod Organizer 2, that there are plugins in the right-hand side that are disabled. This is completely intentional, and should stay that way!
Requirements
Below are the listed requirements in order to run this modlist. You must meet the software requirements and at least the minimum hardware requirements for pleasant experience.
- Clean Fallout: New Vegas Install
- Steam Only
- Outside of the Windows C: Program Files folders
- All Fallout: New Vegas DLC
- Visual C++ Redistributable Package
SYSTEM SPECIFICATIONS
Minimum Requirements
- GeForce GTX 1660Ti
- AMD Ryzen 5 2600X
- 8GB DDR4
- 150GB SSD
Recommended Requirements
- GeForce RTX 3070Ti
- AMD Ryzen 9 5900X
- 32GB DDR4
- 300GB SSD